

Green Screen Lighting: Top Tips for Professional-Looking Videos
Check out these must-know green screen lighting techniques to help you get professional-looking footage in every shoot!


Computer-generated imagery (CGI) and special effects have come a long way since movies like The Empire Strikes Back used a green screen to send Luke Skywalker flying through space. While anyone can notice the change in CGI and special effects since the original Star Wars movies, you might be surprised to learn that green screens themselves have pretty much stayed the same since the 1950s.
Green screens are big green backgrounds that go behind a subject while filming. Video producers and editors use green screens to replace the background of a video with another video or photograph, to isolate objects and create surreal visual effects.
One of the hardest parts of using a green screen is making sure the subject and the background footage look clear and realistic. Proper lighting is essential to clearly separate the subject from the green screen and avoid shadows on the screen itself.
With the help of filmmaker and YouTuber, Chris Brooker, discover how to set up a green screen with proper lighting for a realistic and high-quality final product.
Why Lighting Is Key to Green Screen Success
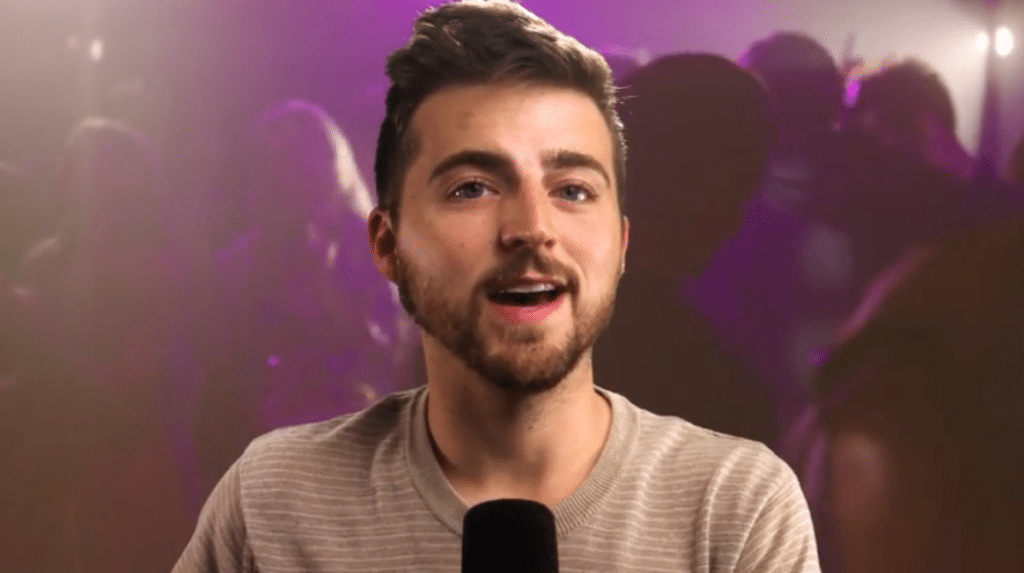
Finding the best lighting for a video depends on the global aesthetic of your project. For example, you might want to record a scene for an indie film where your main character is dancing in a nightclub, but you don’t want to film in a dark and noisy basement.
You could record your character dancing in front of a green screen and then replace the background with video footage from a nightclub. If you look at the picture above, you’ll notice that Chris Brooker replaced the green screen behind him with footage from a nightclub. You’ll see that because of the bright light on his face, he doesn’t blend well into the background.
To make his final product more realistic, Chris should’ve matched the lighting of his green screen footage to the lighting of the desired background footage. He could’ve done this by using less bright lighting on himself or even incorporating some colorful moving lights into his original footage.
No matter if your background footage is a bright and sunny field in England or a dark jungle in Brazil, you’ll need to light your subject appropriately but keep your green screen evenly lit. To do this, you’ll need to light your subject and your green screen independently from one another.
You’ll also want your green screen color to be as uniformly lit as possible in order to avoid harsh shadows and light spots.
Ending up with light spots and dark spots on your screen will make it hard for you to completely remove the green screen while editing. Poor lighting might also cause unwanted dark spots to appear in your final footage or accentuate any wrinkles on your green screen.
How to Set Up a Green Screen
- Choose the Right Space
Before setting up your green screen, you’ll want to make sure you have enough room to film. You’ll need sufficient space between your subject and the green screen to keep your subject’s shadow from appearing on the screen.
You’ll want to keep at least three feet to nine feet—or one to three meters—between your subject and your green screen. The larger your space, the better you’ll be able to control light and shadows.
- Light the Subject vs. the Background
Earlier, you learned that subjects and green screens should be lit independently. Having two separate light setups will allow you to properly light your subject for your future background footage. You also need to light your subject and green screen separately so that you don’t end up with your subject’s shadow on your green screen.
The image above shows the difference between a subject who has a backlight on them and one who doesn’t. In the left-hand image you can see that the subject’s hair is lit up around the edges and generally more light. A backlight can help separate a subject from the green screen and shine light on smaller details.
When lighting your subject, a three-light setup is a popular choice. When lighting your green screen, you’ll want to shine soft lights from each side of the screen. Having two lights on opposite sides means they’ll cancel out any shadows and make for even lighting across the screen.
Your lighting setups will also change depending on the video type you’re working with. For a talking head video or when making a green screen video on Tiktok, you might only use the natural light from your bedroom window. More complex scenes could require five different light sources.
- Lighting the Subject
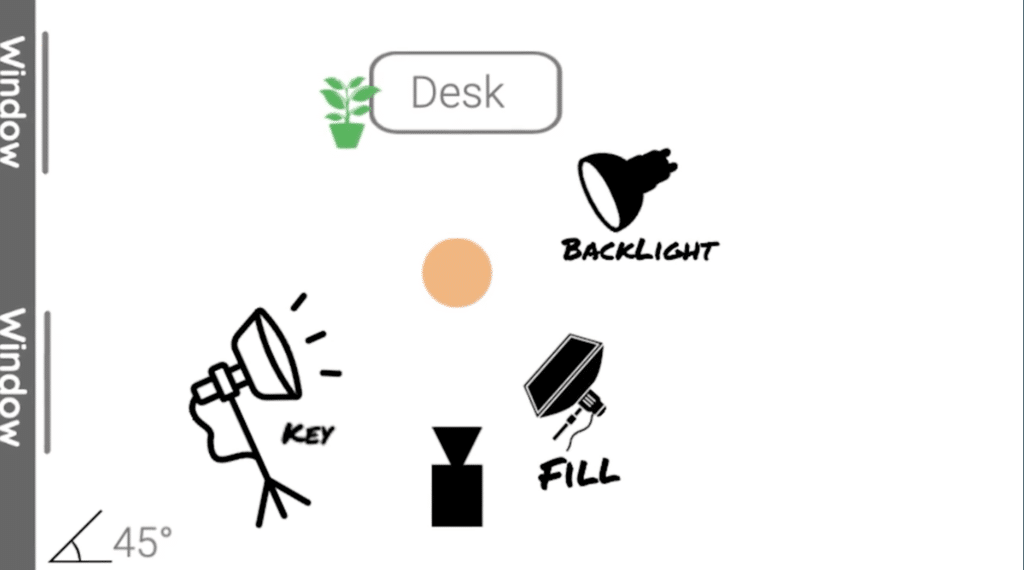
Three-point lighting is one of the most commonly used lighting setups. To create three-point lighting, you’ll use a key light, fill light and backlight. In the graphic above, the key light is the brightest and is placed in front and slightly to the side of the subject.
The fill light is placed on the opposite side of the key light to reduce any harsh shadows caused by the key light. If you don’t have a fill light, you can use a reflector or a piece of white poster board to reflect some of that light back on your subject and reduce shadows on the other side of their face.
Finally, the backlight is placed behind and to the side of the subject to add dimension and separate the subject from the background.
This lighting setup will work well if you want to replace your subject’s background with a static, naturally lit scene. If you want to replace your subject’s background with a nightclub scene, a moody restaurant or the beach at sunset, you would likely choose a different lighting setup to mimic the light in those scenes.
It’s very important to match your subject lighting with your intended background environment.
If your subject’s final environment is going to be a moody restaurant scene, you might create even, low lighting using two warm light sources. You could even light a candle in front of them for a flickering light effect.
A nightclub scene might require only one bright light source and a few colorful lights depending on the aesthetic of the nightclub. While a backlight can help separate you from the background and make your editing process easier, you should avoid using backlights in scenes that happen outside after sunset or darker indoor scenes.
- Light the Green Screen
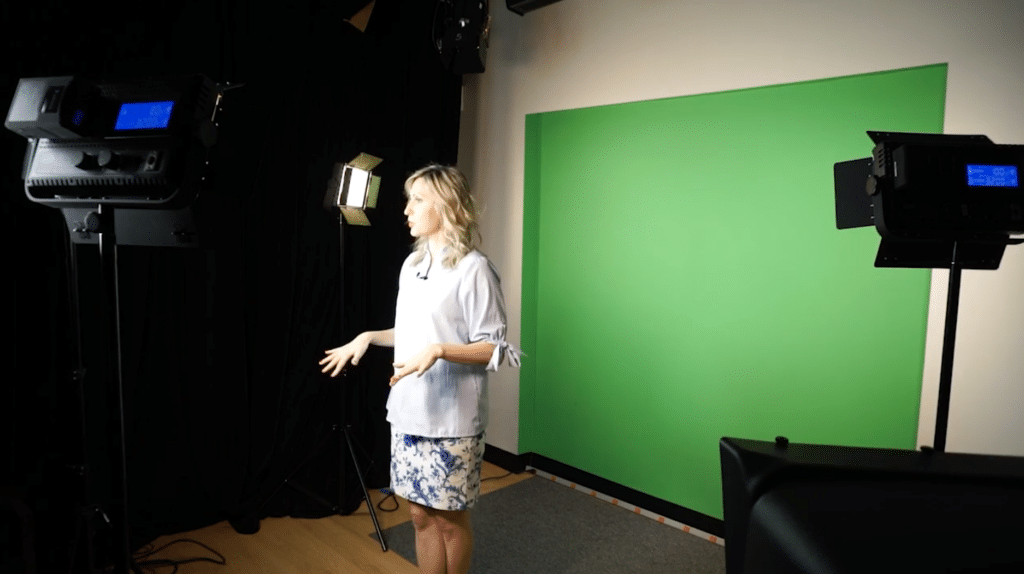
If you take a look at the image above, you’ll see that the lights shining on the green screen are placed in between the subject and the screen. This placement will avoid casting your subject’s shadow on the green screen.
You’ll also see that the two lights are evenly spaced away from the screen and shine a soft, even light.
Dark patches and hot spots are your worst enemies when editing your green screen video. Dark patches happen when you don’t have enough light or your light casts too many shadows. Hot spots occur when your light source is too harsh and can make your green screen appear more textured and too white.
Using soft, even lighting will avoid any dark patches and hot spots.
Softboxes provide diffused and even lighting, which helps minimize harsh shadows. If you don’t have softboxes, you can create diffused lighting by covering your lights with a thin white sheet or using diffusion sheets.
You can also adjust your lighting placement to avoid harsh shadows. When your lights are placed to opposite sides of one another, they’ll cancel out each other’s shadows.
When you’re ready to light your green screen, you should place one on your left and one on your right between the subject and green screen. You can use LED box lights, soft boxes or any other diffused, even light sources. Just make sure both of your lights provide the same strength of light.
You don’t want to use a spotlight to light your green screen because that will create very light and very dark areas on your screen.
Get Started with Video Production
More Film and Video ClassesGood Lighting For Film & Video at Any Budget
DaVinci Resolve 19 Masterclass: The Complete Video Editing & Color Grading Class
From Clueless to Content Creator: Make Engaging Videos That Attract An Audience
Learn Video Editing With Adobe Premiere Pro For Beginners (2025)
Common Green Screen Lighting Mistakes (& How to Fix Them)
Uneven lighting is one of the most common issues you’ll encounter when setting up your green screen. You can avoid uneven lighting by making sure your lights are located between your subject and the screen; they are evenly spaced, and the lights are diffused and provide the same amount of light.
Shadows on your green screen will usually happen when one of your light sources is too harsh or stronger than the other. You can avoid this by using diffused, even lighting. Shadows can also occur if your subject is too close to your screen.
If you don’t have space for your subject to step away from the green screen, you can move your lights closer to it to ensure they stay between the subject and the screen.
Another issue you might face when filming with a green screen is color spill. Color spill occurs when the green from the screen bounces off poorly placed lighting or light-colored hair or clothes onto the subject, which gives them a green tint. You can avoid color spill by moving your subject further away from the green screen and covering reflective elements like a white ceiling with black paint or fabric.
Wrinkles on your green screen can also pose a problem during the post-production process. If your green screen is made out of fabric, you can steam your screen before you start filming. If you have wrinkles in a paper green screen, you’ll need to be extra careful when it comes to even, diffused lighting. Any harsh lighting will make wrinkles even more noticeable.
Advanced Tips for Seamless Green Screen Keying
Chroma keying, often shortened to keying, is the process of removing the green screen background in post-production. The better your green screen lighting is, the easier your keying process will be. These tips can help you get more professional-looking footage when video editing in Premiere Pro or any other video editing software:
- Match your subject’s lighting to their final environment.
- Use color grading in post-production to enhance the seamless effect.
- It’s important to maintain consistent lighting during longer shoots. If you plan to shoot throughout the day, you might choose artificial lighting over natural lighting.
- Consider your video’s final format to ensure you provide enough green screen space around your subject. If you’re more interested in video production for content creators, you might only be shooting in a 9:16 aspect ratio, and it’s important to plan for more vertical green screen space than horizontal space.
Grow Your Videography Skills with Skillshare
Making engaging videos isn’t just about following trends; it’s about making high-quality videos from the start of the filming process through the end of the editing process. Green screen lighting plays an important role in the filming process, and a job well done will mean an easier editing process.
Even, diffused lighting, placing your subject far enough away from the green screen, matching your subject’s lighting to your desired end environment, avoiding wrinkles and lighting your green screen separately from your subject can all help you achieve seamless green screen footage whether you plan to use your video to make YouTube shorts or for your upcoming short film.
If it’s your first time working with a green screen, you might work some extra time into your shoot schedule to experiment with lighting and your subject’s positioning. For even more tips and tutorials on green screen lighting and video production, you can look to Skillshare. By finishing just one class, you’ll be on your way to improving your film and videography skills.
Related Reading


Calli Zarpas
Producer & Writer by occupation. Ceramicist & Newsletter Editor by avocation.

Try Skillshare for free! Sign up for a 7 day free trial today!
Get Started- Unlimited access to every class
- Supportive online creative community
- Learn offline with Skillshare's app


