

How to Draw Stars: A Step-by-Step Guide
Learn how to draw a star with this step-by-step guide! Perfect for beginners, this tutorial covers simple designs and creative tips to get you drawing!


Nature has inspired artists since the beginning of art. Stars have interested artists and scientists alike with their twinkling, bright appearance and curiosity-piquing presence. Artists like Van Gogh and Matisse added abstract stars to skies when drawing a night scene and when creating collages in pieces like The Starry Night and Icarus.
You can join the countless artists who use stars in their works of art by learning how to make this simple, recognizable and emblematic shape. Learning how to draw stars is a fantastic starting point for new artists because stars are simple to learn but they can also be easily adapted to your unique creative style.
All you’ll need to get started is your drawing utensil of choice and a piece of paper. Then, you’ll be ready to dive into the basic steps of drawing a classic star, explore unique variations and discover some helpful creative resources that can really help you master your general illustration skills and give you more advanced star drawing tips.
Materials Needed
You can learn to draw a star with whatever drawing materials you already have at home. The margins of the book you’re reading, a piece of printer paper or a fresh page in your favorite notebook can all welcome your hand-drawn star. The best paper option for sketching and coloring will be tough and thick paper that can handle multiple erasures. Smooth and soft paper that pairs well with your chosen drawing utensil will also improve your overall drawing experience.
Using a pencil with an eraser is the best choice when drawing a new subject because you can always erase little errors or start over from scratch when needed. You can also use pens or markers if those are what’s easiest for you to just grab and get started.
A ruler, compass or circle stencil can help balance your star and improve geometric accuracy while drawing. You don’t need to run out to the store to get these extra tools, but if you already have them at home, they can make your journey to drawing a perfect star even easier.
When you’re first starting a new art project, the best tools are the ones that are the most accessible and can get you creating as quickly as possible. So don’t worry if you don’t have state-of-the-art drawing pencils or paper.
How to Draw a Basic Five-Pointed Star
The gold star you’ll get next to the A+ on the top of your math test, the stars dotting the flags of Pakistan, The United States, Puerto Rico and Morocco and the pink stars lining the Hollywood Walk of Fame are all examples of a classic five-pointed star.
As one of the most popular star designs, the five-pointed star is a good starting point when learning how to draw stars.
Step 1: Start with a Simple Guideline

First, draw a circle using a stencil or compass. You can also create a rough outline of a circle just by drawing one on your own. Another option is to use a ruler to create a pentagon as a guide if you don’t have a stencil or compass. Then, add five dots around your circle. You can start with one dot on the very top and then evenly space your other four dots.
Step 2: Draw the Star Outline
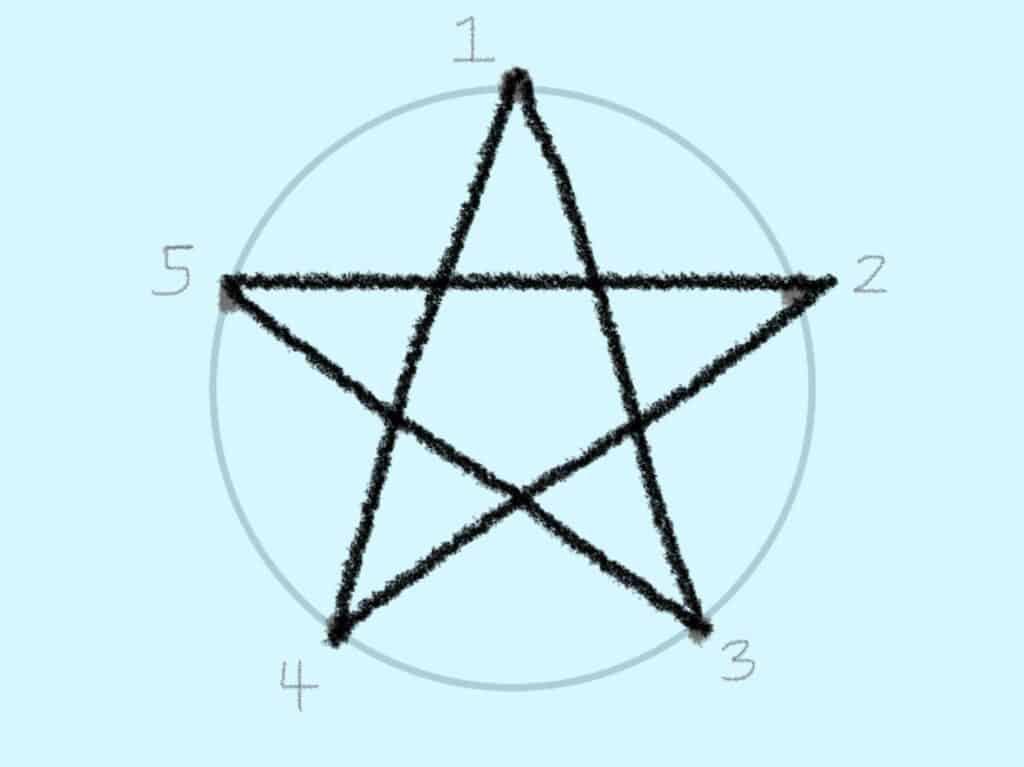
Now, starting with your pencil at dot number one, draw a straight line across to dot number three. Next, create another straight line between dot number three and number five. Then, bring your pencil straight across the page and connect dot number five and dot number two with another straight line.
After that, you’ll draw another straight line between dot number two and dot number four. Finally, connect dot number four and dot number one to create your finished star sketch.
You can redo this step as many times as you need. It’s best to sketch using a graphite pencil and a light amount of pressure so that you can easily go over the lines you like and erase the ones you don’t.
If you’re not confident with your star yet, try drawing it within smaller and larger circles with no guidelines until you feel comfortable proceeding to the next step.
Step 3: Refine and Erase Guidelines
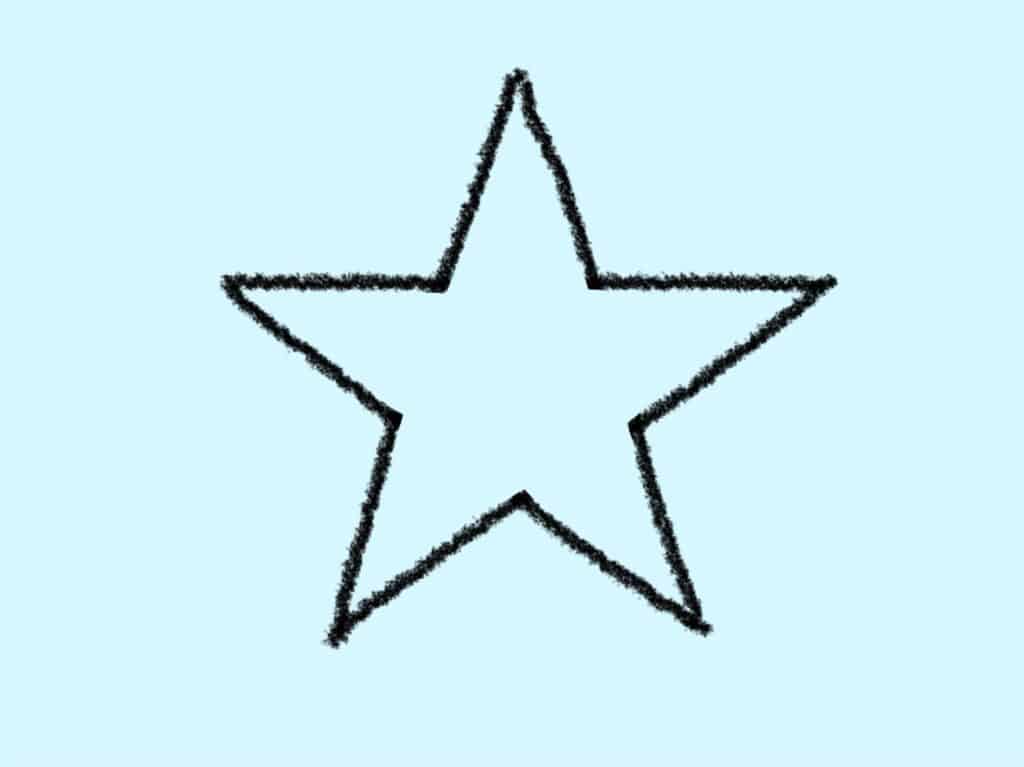
Remember that it’s okay if your lines aren’t completely straight or if some parts of your star look thinner or thicker than others. You’ll need a little bit of practice before your star looks perfect. Plus, a few little mistakes will make your star look like a hand-drawn work of art instead of a stamp or graphic.
Depending on the look you’re going for, you can erase your inner lines, like the artist of the star above, or choose to keep your star as it is. You can also go over any of your lines with a darker pencil, pen or maker to sharpen your star’s shape.
During this step, you can also try drawing a star without any intersecting lines. To do so, you’ll need to draw five wide “V” shapes between each dot. This technique might take some getting used to, so take your time and try drawing at least five stars before deciding which star-drawing technique you prefer.
Step 4: Add Depth (Optional)
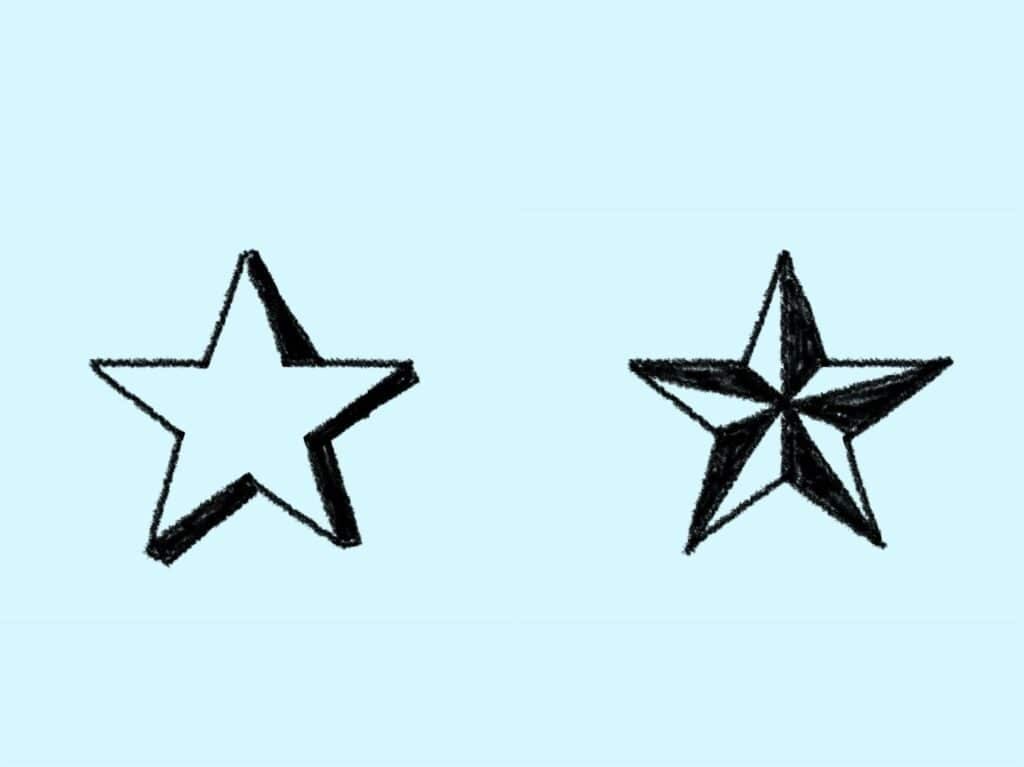
Now it’s time for you to get creative. You can shade or color your star for added dimension or a stylistic twist. Add shadows to the outer edges of your star for a 3D look. You can also create a nautical star by splitting your star into ten triangles and then only coloring in every other triangle.
Other designs you could explore might include adding stripes, polka dots or an inner star.
More Types of Stars to Draw
There are dozens of different stars you can add to your drawing repertoire once you’ve mastered the five-point star. You can play around with your star creations by adding or removing dots on your original circular guideline from step one of drawing a five-point star or by using a thinner oval shape as your guideline.
Six-pointed stars are used in cultures and cities around the world including as the Star of David and in the Chicago flag. The seven-pointed star can be found on the flag of Australia and the flag of Jordan as well as on the seal of the Cherokee nation. Eight-pointed stars are used throughout the Arabic world in decorative art. If you have a free moment, take some time to look up a few popular pointed stars so that you can get inspiration for your own creations.
If you want to create stars outside of the classic geometric pointed stars, here are some other star drawing styles to learn:
Shooting Stars
You can add tails and motion lines to your five-point stars to create the illusion of movement.
Star Clusters
If you’re drawing a sky full of stars you can create star clusters by grouping stars of varying sizes together. Real-life star clusters in the night sky include the Pleides, also known as the seven sisters, Omega Centauri and the Little Beehive Cluster.
Constellations
Constellations, like star clusters, are groups of stars in the night sky that come together to make recognizable shapes. They often represent mythological creatures or myths and animals like a swan and a pegasus.
Rounded Star
You can draw curved lines between your dots for a softer and puffier-looking star.
Abstract Star
Take some time to explore some famous works of art that contain stars like Starry Night Over the Rhone, The Great Comet of 1680 Over Rotterdam and Starlight Night. Georgia O’Keefe’s stars are little abstract squares while Lieve Verschuier’s great comet is a bright yellow curved line that crosses almost the entire sky from top to bottom.
If you’re not enticed by any of these ideas you can also draw from your imagination or add stars into any of your existing artwork. You can have fun adapting your star drawings to your creative style.
Top Tips for Drawing Stars
Every artist has their own preferred way of drawing stars. Some are inspired by the glittering north star or a historic comet while others draw stars using the art materials and style they would use to draw any other scene or artistic element. Matisse created stars in his collage pieces by cutting them out of paper so you can even make a star without even drawing at all.
As you get started with your art drawing journey, here are a few things to keep in mind:
- You can always use stencils or other geometric guidelines when drawing to improve the accuracy of your final star.
- When you first try out a new style of star drawing, try starting with lightly drawn sketches so that you can easily adjust your shapes and quickly erase any mistakes.
- Once you’ve gotten the hang of working with a circular guideline, try moving on to practicing freehand drawing. Freehand drawing can help boost your drawing confidence and save time when it comes to erasing and sketching.
- Have fun and keep experimenting with different techniques. This week, you might focus on five-point stars, but next week, you might try creating stars using different media like watercolors and gouache or digital drawing tools like Procreate and Adobe Fresco.
- Try to explore at least five different types of stars so that you can decide which techniques work best for you.
Learn to Draw Stars and More with Skillshare
Even if you’ve only drawn a few stars so far, you’ve taken the first step to becoming an illustrator, artist or just a creative with an occasional habit of drawing perfect stars. If you’ve always dreamed of being more creative or making art a more regular part of your life, having a supportive community to cheer you on and guide you through your challenges and successes can help make your experience as a budding artist even more rewarding.
With an online community and learning space like Skillshare, you can also interact with professional artists and get project-based art ideas so you never run out of things to work on. You might take a class that acts as an intro to drawing and illustration so you can discover more about shading, lighting and geometric shape creation.
To stay motivated on your drawing journey, you might also find it helpful to add goals or solo drawing dates on your calendar. This week, you could pencil in one hour of six-pointed star drawing, and next week, you might dive into how to draw constellations or other celestial objects so that you’re always expanding your skills and moving forward as an illustrator. Before you move on to your next task, you can also make a list of things to draw so you don’t have to think of any new ideas for a while.
Related Reading
Calli Zarpas
Producer & Writer by occupation. Ceramicist & Newsletter Editor by avocation.
Level-Up Your Drawings and Illustrations with Skillshare
Start Your Free Trial Today!- Drawing classes for all levels
- Digital and traditional drawing styles
- Unlimited access to all classes


