

How to Use the Generative Fill Tool in Photoshop
Discover how to transform images with Photoshop’s Generative Fill tool in this simple guide to its creative possibilities.


You’ve likely had a photo that isn’t quite big enough, has the wrong balance or includes that one detail that throws everything off. It’s not enough to start over, but the effort to fix things is tedious and might not even work out in the end.
Enter Photoshop’s Generative Fill. Adobe’s Generative Fill tool uses AI (artificial intelligence) to add content to or remove it from existing images. It’s designed to give you more control over the final product without demanding a great deal of time or editing expertise.
If you’re new to using AI within digital art, these articles might be useful before getting started with Photoshop’s Generative Fill tool:
- How to Use AI in Photoshop
- 18 Game-Changing Shortcuts in Photoshop to Master
- 8 Adobe Photoshop Projects for Beginners
- How to Use Content-Aware Fill in Photoshop
- How to Face Swap in Photoshop Like a Professional Designer
- Introduction to Adobe for Creatives
In this article, you’ll learn Generative Fill’s purpose, its applications and tips for success in your personal and professional projects.
What is the Generative Fill Tool?
Photoshop’s Generative Fill, powered by Adobe Firefly, is an AI tool that generates visual content based on simple text prompts. With it, you can non-destructively add to or remove from existing images for a realistic final piece.
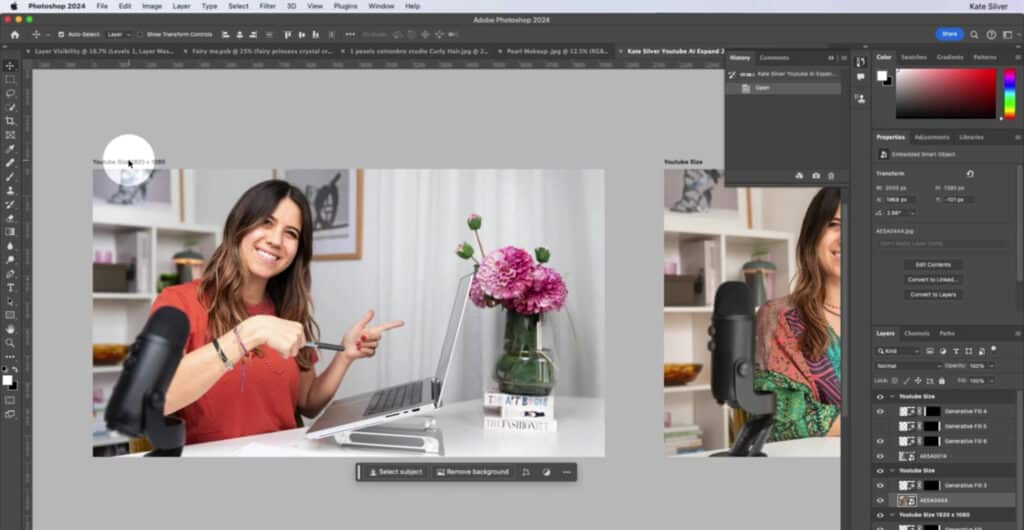
The Generative Fill’s main capabilities include object removal, background extension and adding elements. This is less about creating images from a text prompt and more about telling the tool to make the edits that would keep you away from other creative endeavors.
For example, your photo might have a distracting shadow. You could spend an hour editing it out, or tell Generative Fill to do it. Perhaps the background of a client’s headshot needs to be just a little wider to meet size requirements–AI can simply extend the background you already have. Or, an empty spot in an image completely ruins the balance of a product ad, so you tell Generative Fill to sneak a small plant into the spot.
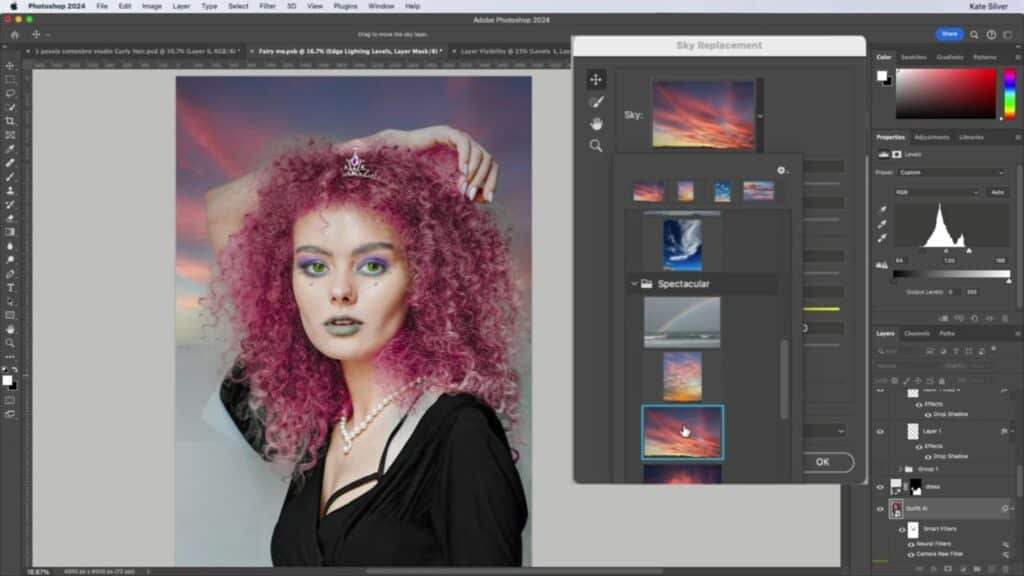
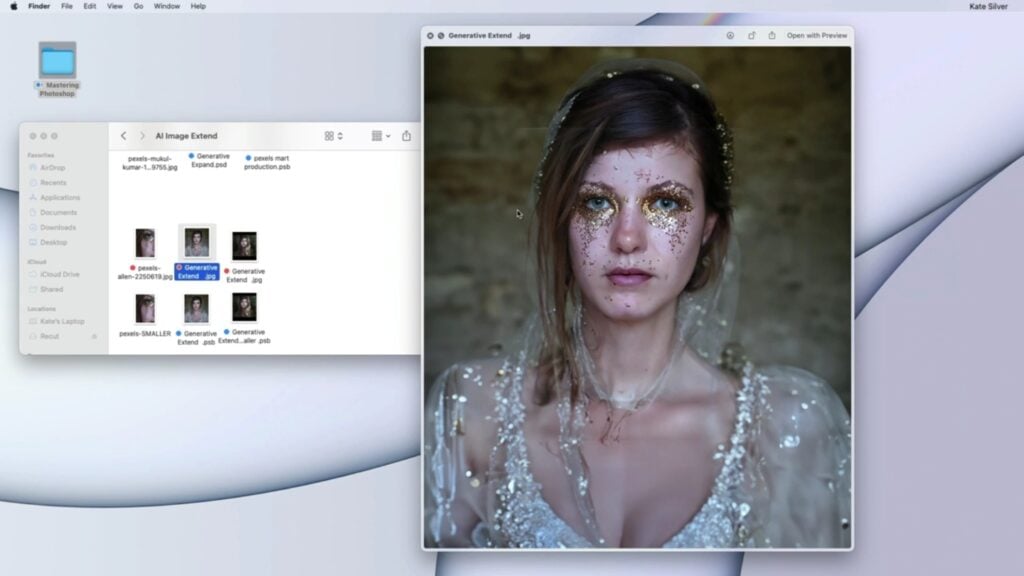
You can also use Generative Fill to transform a landscape. For example, you can turn a vertical shot of a tree into a horizontal landscape or create a composite of a mountain background with an outer space sky.
Your options truly are endless, even when working with existing photos (as opposed to creating from only text prompts). Concentrate on creative ideas, not the busy work of making them happen.
How to Use the Generative Fill Tool
Using the Generative Fill tool in Photoshop can be as simple or complex as you want it to be. It’s up to you how much instruction you provide the AI.
1. Select the Work Area
Use a selection tool, such as the Selection Brush tool, to designate an object or area in your project. It can be a blank area, a spot needing more attention or even an object you want removed. A Generative Fill button should appear in the Contextual Task Bar–click that.
2. Tell Generative Fill What to Do
You’ll see a text-entry prompt box, and you have the option to write in it or leave it blank.
If it’s blank, the AI will fill in the selected space based on the existing image, such as extending a road, completing a face or simply filling in with contextual colors and textures.
If you provide text, the AI will do its best to create the object or scene you describe. If the idea is particularly difficult to describe, you can customize it further by uploading an example image (“Reference Image” in the Photoshop (beta) app) that you’d like to see incorporated.
In either case, the generated imagery should be seamless, without any indication that it wasn’t part of the original photograph.
3. Generate and Select the Image
Once you’ve set your prompting text and images, click “Generate.” Photoshop will provide thumbnails, previewing the various options it created. To keep the Generative Fill nondestructive, it’s put into its own layer in the Layers Panel. Your original image won’t be altered at all.
Choose your favorite result and use it if it’s right. Alternatively, you can have the tool provide more options by clicking “Generate Similar.” Play around with combining text and images until your vision is achieved.
Level-Up Your Photoshop Skills
Browse More Design Classes5 Advanced Adobe Photoshop Tips: Photo Editing Beyond Lightroom
Collage Animation: Creative Motion Graphics with Photoshop & After Effects
Showcase Your Artwork – Make Your Own Mockups | in Adobe Photoshop
Digitizing Your Paint: Selecting and Adjusting Artwork in Photoshop
Tips for Getting the Best Results
It will likely take some practice to get the exact image you want. You’ll need to spend time experimenting with different word combinations and ordering to learn the subtleties of how the AI tool interprets your prompts.
For example, check out how it changes your image when you get highly specific as opposed to using creative, experimental language.
Once your AI-created imagery is in place, you can edit it as you would other imagery for enhancements and improvements. Sometimes, AI content has odd little spots of blurs and strange marks. Use brushes and other tools to refine these, making the final product even more seamless. This is especially important if you’re working on pictures for a commercial publication or client.
Just because you’re working with photos doesn’t mean everything has to be realistic. Why not instruct the Generative Fill tool to create surreal characters or landscapes? Let your imagination run wild by adding fantastic elements to recognizable backgrounds, or make human models otherworldly with the addition of anything from wings to sparkles.
Why Try the Generative Fill Tool?
You’ve probably heard some of the pushback from artists and others, concerned that AI creates without any real substance, and there’s certainly a worthwhile debate to be had on that.
At the same time, AI Generative Fill isn’t designed to create art out of nothing. It’s meant to do the work that costs creatives time and energy without taking over your creative vision.
For example, say you’ve got someone’s photos for their website, and you notice that one picture would be better if the background extended just another 100 pixels. It would take a long time to get the colors and lighting matched just right, but with Generative Fill, you can make a seamless addition in literally seconds.
Beyond these practical uses, the tool can inspire creativity by providing new image editing possibilities in an accessible and even fun environment.
Examples of the Generative Fill Tool in Action
Check out these examples of Photoshop’s Generative Fill tool doing its thing in the Skillshare class Mastering Adobe Photoshop CC: Advanced Retouching, Mockups, & AI Generative Fill by Kate Silver. The first example used AI to extend the edge of an image, while the second example expanded on a core idea to create a larger, more complete image.
Should You Use AI in Photoshop?
How you create your art is up to you and your clients. At this point, using AI in art remains a difficult topic for many creatives because it is a vastly different tool than anything used until now.
On one hand, it can drastically cut the time you spend plotting out ideas and manually turning them into a reality. It can suggest the next moves and offer minor tweaks that make a big difference.
On the other hand, it removes some of the need to create. For many artists and art enthusiasts, the process of idea generation and implementation makes art worth looking at. Beyond that, many people are uncomfortable with AI’s use of existing art to “learn” to create on its own.
As long as you’re using AI ethically, being up front about what’s human-made and what’s generated by digital tools, the decision is yours. Further, you can always limit your AI use to a supportive role, rather than using it to start from scratch.
For more thoughts on using AI ethically, download Skillshare’s report on Creativity in the Age of AI.
Learn Photoshop and More with Skillshare
Photoshop’s Generative Fill tool is designed to help you fill in the gaps and complete tedious tasks quickly. While you can use it to create art from nothing more than text prompts, it’s primarily meant to support high-quality photo editing.
Skillshare has plenty of resources and teachers who specialize in both Photoshop and AI. Check out some of these classes if you’re ready to get started:
- Mastering Adobe Photoshop CC: Advanced Retouching, Mockups & AI Generative Fill
- Photoshop Workflows - Seamless Pattern Design
- Photoshop Workflows - Dreamscapes
- Adobe Photoshop CC–Essentials Training Course
- Learn Adobe Photoshop: Fundamentals for Getting Started
The value of learning on Skillshare with professionals and a supporting community can’t be overstated. Whether you choose to incorporate AI into your art or not, a better understanding of how it works will prepare you for what’s coming in personal and professional endeavors.
Related Reading


Katie Mitchell
Katie lives in Michigan with her husband, kids and pets. She enjoys cooking, travel and live music.

Learn Photoshop with Skillshare – Start Your Free 7-Day Trial Now!
Get Started- Unlimited access to all classes
- Hands-on learning with Photoshop pros
- Supportive online creative community


